Long lens sharpness

When I started photographing birds for the first time in early 2010 I had a full-frame camera body and a Canon EF 300mm/f2.8 IS and EF 500mm/f4 IS MkI lens that I used for sailing photography from a boat or a helicopter. My good friend and nautical photographer Onne Van der Wal (www.vanderwal.com) had taught me to handhold the lenses while photographing from a moving boat. I was not really used to using very long lenses and a tripod to photograph small living subjects like birds. I had followed to blog of Arthur Morris (www.birdsasart.com) for a while and was intrigued by the technical information that was provided. It made me decide to do a workshop with him to improve my photography. I had nothing with birds. To me a bird was a bird, and I could not tell the difference between them. I borrowed the new EF 800mm/5.6 IS lens from Canon and had trouble keeping the subject in the frame or even finding it at all due to the narrow field of view. Working with a tripod was a new feature for me as well. Making sharp images even more difficult. I struggled through the workshop but the long lens changed my perspective on the subject, and got me enthusiastic about birds. I was seeing things that I was never really aware of. Birds are beautiful, and getting a closer look at these incredible creatures changed my view and got my curiosity going.

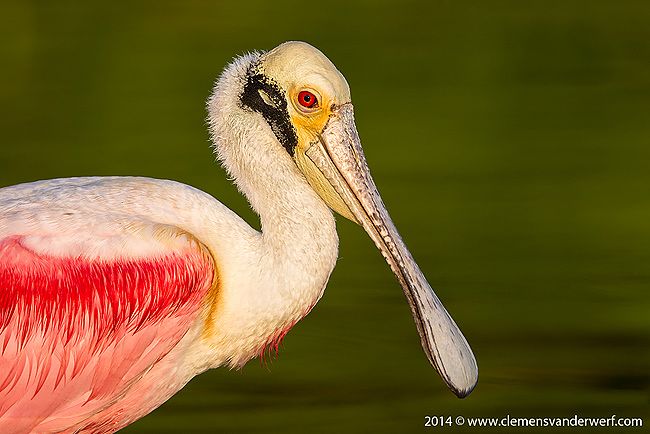
A lot has been written about how long a long lens needs to be. The obvious answer is "it depends". A 500mm lens in combination with a teleconverter works great and will give you ample reach in most cases, certainly here in Florida where you can get relatively close to the subjects. In my quest to get even closer to the smaller shorebirds I added the Canon 1D MkIV body (with 1.3 crop factor) and the Canon EF 800mm/f5.6 IS lens to my equipment list, giving me an effective focal length of 1040mm on a full frame basis. Adding a 1.4x teleconverter to this combination would reach 1456mm, compared to 1300mm based on a 500mm lens with a 2.0x teleconverter. With the 3-stop Image Stabilization on the 800mm lens, this proofed to be a deadly couple for photographing birds. The sharpness of the long prime Canon lenses is amazing. Even is you push the limits and use the 800mm with the 2.0x teleconverter the sharpness is still very good, as is the case with the image of the Roseate Spoonbill.

Roseate-Spoonbill-head-portrait-with-green-bkgd_M7E5518-Eco-Pond-Everglades-National-Park-FL.jpg

Roseate Spoonbill portrait taken with the Canon EF 800mm/f5.6 IS and the TC 2.0x MkII using Live View to focus. Canon EOS 1D MkIV, Canon EF 800mm/f5.6 IS lens and 2.0x TC MkII at 1600mm, F11, 1/640s, ISO 800, manual mode in Live View. Image by Clemens Vanderwerf and copyright 2014

When the new version of the long Canon lenses came out I decided to change my strategy and sell my 500mm and 800mm and buy the new 600mm MkII, which is lighter in weight than the 800mm, and will give you more focal length flexibility in combination with the 1.4x and 2.0x teleconverters. The effective focal length reaches from a straight 600mm to 1200mm on a full frame camera body, which is a great plus compared with the 800mm. If the subjects are getting larger, such as Coastal Brown Bears in Alaska for example, you will often find yourself too close to the subject and run the risk of framing the brown bear too tight. Increasing the distance to subject is the only solution here (which many people do not consider a problem when it involves bears), but in general that is not what we want. In the image below I was laying down on the mudflats when this young brown bear came walking up to me. I had to stop taken images as the bear came within minimum focusing distance range and I simply could not focus anymore.

  • Coastal-Brown-Bear-close-up-with-blue-bkgd_W7C9249-Hallo-Bay-Katmai-NP-AK1.jpg

Coastal Brown bear getting close to minimum focusing distance, Katmai National Park & Preserve, Alaska. Canon EOS 5D MkIII, Canon EF 800mm/f5.6 IS lens at 800mm, f5.6, 1/1250s, ISO 640, Manual Exposure. Image by Clemens Vanderwerf and copyright 2012

The versatility and sharpness of the new Canon EF 600mm/f4 MkII lens is really remarkable. Combined with the new MkIII teleconverters the focusing is fast and very accurate, and will let you capture the action when it happens.

  • Great-egret-in-breeding-colors-catching-prey_E7T4121-Estero-Lagoon-Fort-Myers-Beach-USA.jpg

Great Egret in breeding plumage fishing, Estero Lagoon, Fort Myers Beach, FL, USA. Canon EOS 1Dx, Canon EF 600mm/f4 IS lens at 600mm, f5.6, 1/1600s, ISO 1250, Manual exposure on tripod. Image by Clemens Vanderwerf and copyright 2014

  • Great-Blue-Heron-with-little-eel-in-green-reflections_E7T3475-Estero-Lagoon-Fort-Myers-Beach-USA.jpg

Great Blue Heron catching a little eel, Estero Lagoon, Fort Myers Beach, FL, USA. Canon EOS 1Dx, Canon EF 600mm/f4 IS lens and 2.0x TC MkIII at 1200mm, f8, 1/640s, ISO 1250, Manual exposure on tripod. Image by Clemens Vanderwerf and copyright 2014

  • Wilson-plover-with-grass-in-background_E7T1750-Estero-Lagoon-Fort-Myers-Beach-USA.jpg

Wilson's Plover on the beach, Estero Lagoon, Fort Myers Beach, FL, USA. Canon EOS 1Dx, Canon EF 600mm/f4 IS lens and 2.0x TC MkIII at 1200mm, f9, 1/800s, ISO 400, Manual exposure on tripod. Image by Clemens Vanderwerf and copyright 2014

  • Wilsons-Plover-doing-wing-flap_E7T3196-Estero-Lagoon-Fort-Myers-Beach-USA.jpg

Wilson's Plover doing a wing flap after bathing, Estero Lagoon, Fort Myers Beach, FL, USA. Canon EOS 1Dx, Canon EF 600mm/f4 IS lens and 2.0x TC MkIII at 1200mm, f8, 1/1000s, ISO 1000, Manual exposure on tripod. Image by Clemens Vanderwerf and copyright 2014

  • Great-Blue-Heron-with-little-fish-in-mid-air_E7T4461-Estero-Lagoon-Fort-Myers-Beach-USA.jpg

Great Blue Heron catching a little fish, Estero Lagoon, Fort Myers Beach, FL, USA. Canon EOS 1Dx, Canon EF 600mm/f4 IS lens and 1.4x TC MkIII at 840mm, f6.3, 1/2000s, ISO 400, Manual exposure on tripod. Image by Clemens Vanderwerf and copyright 2014

Creating sharp images with long lenses on a consistent basis under different light situations depends on good technique from the photographer. It is crucial that any vibrations are eliminated during the exposure. The 4-stop image stabilization on the lens is great but not enough to overcome all vibrations. Supporting the lens over the full length is important to reduce vibrations to a minimum level. One technique is to put your left hand on top of the lens barrel and apply a slight downward pressure, while at the same time press your face firmly against the back of the camera and apply a very slight downward pressure with your right hand. By "bending-the-lens" this way, you take away pretty much all the vibrations caused by the operator. It also helps to get your breathing under control at the same time.

  • Clemens-with-long-lens-II.jpg

Long lens technique supporting the lens with hand on top of the lens. Image copyright Denise Ippolito

Although I started with supporting the lens from above, my preferred technique is supporting the lens from below with my left hand, and my face firmly pressed against the back of the camera. This is much more reliable than holding the lens on top and trying to keep it steady with downward pressure. This technique gives me the most flexibility when tracking a subject. It is personal preference if you keep the gimbal head arm on the left or on the right side.

  • Clemens-with-long-lens.jpg

Long lens technique with hand supporting the lens from underneath. Image copyright of Arthur Morris

On a recent trip to La Jolla, CA and Fort Myers, FL I wanted to test the sharpness of the lens and my own technique by using both teleconverters at the same time creating a very long focal length of 1680mm. The quality of the new Canon lenses and teleconverters is so amazing that using both teleconverters hardly reduces the sharpness of the image. The biggest factor in creating sharp images at such long focal length is by far your own technique of stabilizing the lens. In order to stack the MkIII converters you need an extension tube between them (I used the 25mm extension tube). Autofocus is not possible with this set-up, so you need to focus manually. As the view through the viewfinder is pretty dark, it is best to use a contrast rich area or pattern on the subject to dial in sharp focus. This will take some practice but is easy to get used too. It helps to take 2-3 images at a time, which guarantees that at least one will be sharp from the series.

  • Brown-pelican-eye-close-up-with-colors_Stacked-Converters-Manual-focus_E7T4660-Estero-Lagoon-Fort-Myers-Beach-USA.jpg

Brown pelican close up in breeding plumage, Estero Lagoon, Fort Myers Beach, FL, USA. Canon EOS 1Dx, Canon EF 600mm/f4 IS lens and 1.4x TC MkIII plus 2.0x TC MkIII stacked with 25mm extension tube at 1680mm, f16, 1/250s, ISO 1250, Manual exposure and focus on tripod. Image by Clemens Vanderwerf and copyright 2014

Once you have the right lens stabilizing technique under control you will be amazed at the sharp images that you create with long focal lengths in combination with slow shutter speeds. But remember practice makes perfect!

  • Brandts-comorant-in-breeding-plumage-with-stacked-converters_E7T0479-La-Jolla-Cliffss-La-Jolla-USA1.jpg

Brandt's comorant close up in breeding plumage, La Jolla, CA, USA. Canon EOS 1Dx, Canon EF 600mm/f4 IS lens and 1.4x TC MkIII plus 2.0x TC MkIII stacked with 25mm extension tube at 1680mm, f8, 1/640s, ISO 400, Manual exposure and focus on tripod. Image by Clemens Vanderwerf and copyright 2014